Mybatis 中支持的数据源
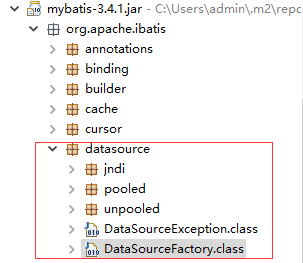
在上篇文章中,我们知道 Mybatis 中支持三种形式数据源的配置,分别为:UNPOOLED、POOLED 和 JNDI ,如下红色区域所示:
在 Mybatis 内部定义了一个接口 DataSourceFactory,而支持的三种形式都需要实现这个接口。DataSourceFactory 接口定义如下:
1
2
3
4
5
6
7
8
package org.apache.ibatis.datasource;import java.util.Properties;import javax.sql.DataSource; public interface DataSourceFactory void setProperties (Properties props) DataSource getDataSource () ; }
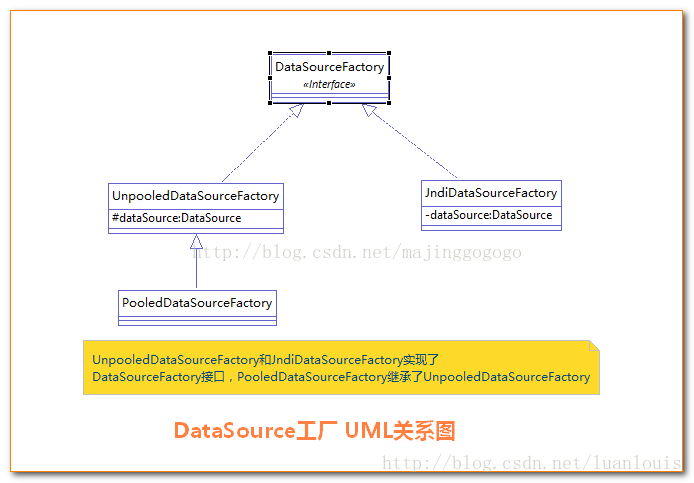
与 UNPOOLED、POOLED 和 JNDI 相对应的,在 mybatis 内部定义实现了 DataSourceFactory 接口的三个类,分别为 UnpooledDataSourceFactory、PooledDataSourceFactory和JndiDataSourceFactory 。
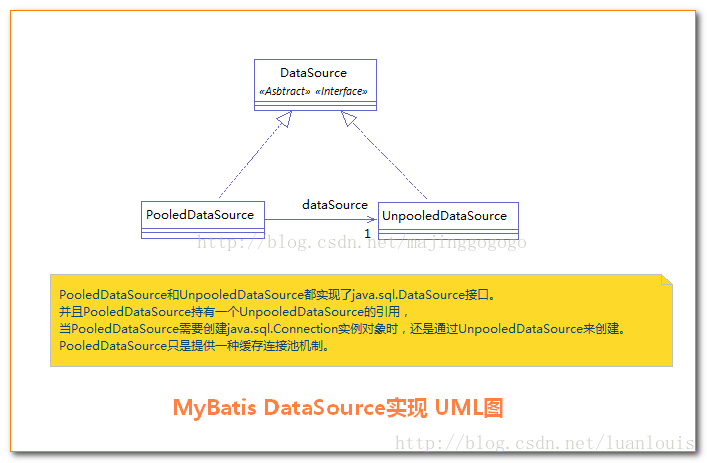
与这些数据源工厂类相对应的也定义了相应的数据源对象,其中 UnpooledDataSourceFactory 和 PooledDataSourceFactory 工厂返回的分别是 UnpooledDataSource 和PooledDataSource ,而 JndiDataSourceFactory 则是根据配置返回相应的数据源。
Mybatis中数据源的创建过程
首先从配置文件开始看起:
1 2 3 4 5 6 7 <dataSource type ="POOLED" > <property name ="driver" value ="${driver}" /> <property name ="url" value ="${url}" /> <property name ="username" value ="${username}" /> <property name ="password" value ="${password}" /> </dataSource >
(a)在 mybatis 初始化的时候,在解析到 <dataSource> 节点时,会根据相应的 type 类型设置来创建相应的数据源工厂类实例,如下所示:
1
2
3
4
5
6
7
8
9
10
11
12
DataSourceFactory dsFactory = dataSourceElement(child.evalNode("dataSource" )); private DataSourceFactory dataSourceElement (XNode context) throws Exception if (context != null ) { String type = context.getStringAttribute("type" ); Properties props = context.getChildrenAsProperties(); DataSourceFactory factory = (DataSourceFactory) resolveClass(type).newInstance(); factory.setProperties(props); return factory; } throw new BuilderException("Environment declaration requires a DataSourceFactory." ); }
在上面代码里,根据 type 类型去寻找相应的数据源工厂类并实例化一个。具体每一个配置对应什么类,在 Configuration 类中已经进行了声明,如下所示:
1
2
3
typeAliasRegistry.registerAlias("JNDI", JndiDataSourceFactory.class); typeAliasRegistry.registerAlias("POOLED", PooledDataSourceFactory.class); typeAliasRegistry.registerAlias("UNPOOLED", UnpooledDataSourceFactory.class);
(b)之后,从数据源工厂类实例中通过 getDataSource() 方法获取一个 DataSource 对象;
(c)MyBatis 创建了 DataSource 实例后,会将其放到 Configuration 对象内的 Environment 对象中, 供以后使用。如下所示:
1
2
3
4
5
6
DataSourceFactory dsFactory = dataSourceElement(child.evalNode("dataSource" )); DataSource dataSource = dsFactory.getDataSource(); Environment.Builder environmentBuilder = new Environment.Builder(id) .transactionFactory(txFactory) .dataSource(dataSource); configuration.setEnvironment(environmentBuilder.build());
数据源 DataSource 对象什么时候创建数据库连接
当我们需要创建 SqlSession 对象并需要执行 SQL 语句时,这时候 MyBatis 才会去调用 dataSource 对象来创建 java.sql.Connection 对象。也就是说,java.sql.Connection 对象的创建一直延迟到执行 SQL 语句的时候。
1
2
3
4
5
6
public void testFindUserById () SqlSession sqlSession = getSessionFactory().openSession(true ); UserDao userMapper = sqlSession.getMapper(UserDao.class); User user = userMapper.findUserById(10 ); System.out.println("记录为:" +user); }
对于上面这段代码,我们通过调试会发现,在前两句的时候其实是没有创建数据库连接的,而是在执行 userMapper.findUserById() 方法的时候才触发了数据库连接的创建。
非池化的数据源 UnpooledDataSource
我们先直接从代码入手:
1
2
3
4
5
6
7
8
9
10
11
12
13
14
15
16
17
18
19
20
21
22
23
24
25
@Override public Connection getConnection () throws SQLException return doGetConnection(username, password); } private Connection doGetConnection (String username, String password) throws SQLException Properties props = new Properties(); if (driverProperties != null ) { props.putAll(driverProperties); } if (username != null ) { props.setProperty("user" , username); } if (password != null ) { props.setProperty("password" , password); } return doGetConnection(props); } private Connection doGetConnection (Properties properties) throws SQLException initializeDriver(); Connection connection = DriverManager.getConnection(url, properties); configureConnection(connection); return connection; }
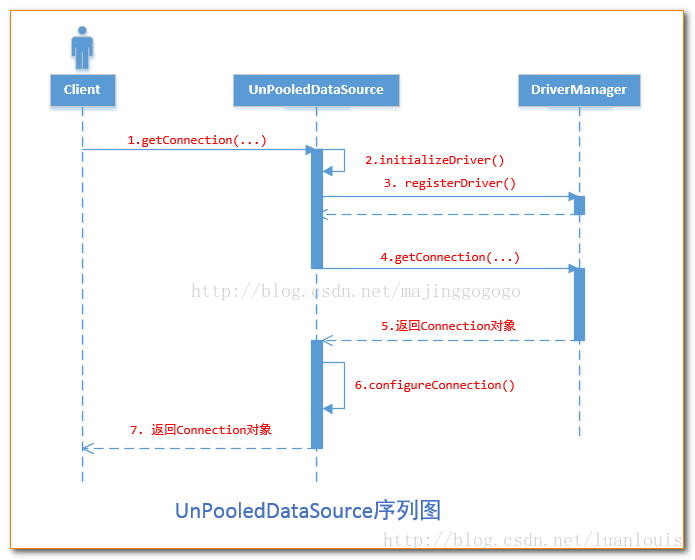
从上面的代码可以知道 UnpooledDataSource 创建数据库连接的主要流程,具体时序图如下所示:
(b)调用 DriverManager.getConnection() 获取数据库连接;
(c)对数据库连接进行一些设置,并返回数据库连接 Connection ;
设置数据库连接是否自动提交,设置事务级别等。
有人可能会有疑问,这里的 username 和 password 是什么传递给数据源的呢?<dataSource>元素,并将其下相关的 <property> 配置作为数据源的配置初始化进去了。也就是下面这段逻辑:
1
2
3
Properties props = context.getChildrenAsProperties(); DataSourceFactory factory = (DataSourceFactory) resolveClass(type).newInstance(); factory.setProperties(props);
至此,对于 UnpooledDataSource 数据源算是有比较清楚的了解了。下面我们看看带连接池的 PooledDataSource
带连接池的 PooledDataSource
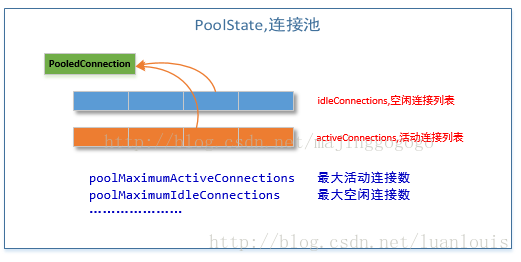
为什么要使用带连接池的数据源呢,最根本的原因还是因为每次创建连接开销比较大,频繁的创建和关闭数据库连接将会严重的影响性能。因此,常用的做法是维护一个数据库连接池,每次使用完之后并不是直接关闭数据库连接,再后面如果需要创建数据库连接的时候直接拿之前释放的数据库连接使用,避免频繁创建和关闭数据库连接造成的开销。idleConnections 和 activeConnections 。
idleConnectionsactiveConnections
下面我们看看怎么从连接池中获取一个数据库连接,还是从 PooledDataSource 类开始看起。
1
2
3
4
5
6
7
8
@Override public Connection getConnection () throws SQLException return popConnection(dataSource.getUsername(),dataSource.getPassword()).getProxyConnection(); } @Override public Connection getConnection (String username, String password) throws SQLException return popConnection(username, password).getProxyConnection(); }
这里都是调用了 popConnection() 方法,然后返回其代理对象。
1
2
3
4
5
6
7
8
9
10
11
12
13
14
15
16
17
18
19
20
21
22
23
24
25
26
27
28
29
30
31
32
33
34
35
36
37
38
39
40
41
42
43
44
45
46
47
48
49
50
51
52
53
54
55
56
57
58
59
60
61
62
63
64
65
66
67
68
69
70
71
72
73
74
75
76
77
78
79
80
81
82
83
84
85
86
87
88
89
90
91
92
93
94
95
96
97
98
99
100
101
102
private PooledConnection popConnection (String username, String password) throws SQLException boolean countedWait = false ; PooledConnection conn = null ; long t = System.currentTimeMillis(); int localBadConnectionCount = 0 ; while (conn == null ) { synchronized (state) { if (!state.idleConnections.isEmpty()) { conn = state.idleConnections.remove(0 ); if (log.isDebugEnabled()) { log.debug("Checked out connection " + conn.getRealHashCode() + " from pool." ); } } else { if (state.activeConnections.size() < poolMaximumActiveConnections) { conn = new PooledConnection(dataSource.getConnection(), this ); if (log.isDebugEnabled()) { log.debug("Created connection " + conn.getRealHashCode() + "." ); } } else { PooledConnection oldestActiveConnection = state.activeConnections.get(0 ); long longestCheckoutTime = oldestActiveConnection.getCheckoutTime(); if (longestCheckoutTime > poolMaximumCheckoutTime) { state.claimedOverdueConnectionCount++; state.accumulatedCheckoutTimeOfOverdueConnections += longestCheckoutTime; state.accumulatedCheckoutTime += longestCheckoutTime; state.activeConnections.remove(oldestActiveConnection); if (!oldestActiveConnection.getRealConnection().getAutoCommit()) { try { oldestActiveConnection.getRealConnection().rollback(); } catch (SQLException e) { log.debug("Bad connection. Could not roll back" ); } } conn = new PooledConnection(oldestActiveConnection.getRealConnection(), this ); oldestActiveConnection.invalidate(); if (log.isDebugEnabled()) { log.debug("Claimed overdue connection " + conn.getRealHashCode() + "." ); } } else { try { if (!countedWait) { state.hadToWaitCount++; countedWait = true ; } if (log.isDebugEnabled()) { log.debug("Waiting as long as " + poolTimeToWait + " milliseconds for connection." ); } long wt = System.currentTimeMillis(); state.wait(poolTimeToWait); state.accumulatedWaitTime += System.currentTimeMillis() - wt; } catch (InterruptedException e) { break ; } } } } if (conn != null ) { if (conn.isValid()) { if (!conn.getRealConnection().getAutoCommit()) { conn.getRealConnection().rollback(); } conn.setConnectionTypeCode(assembleConnectionTypeCode(dataSource.getUrl(), username, password)); conn.setCheckoutTimestamp(System.currentTimeMillis()); conn.setLastUsedTimestamp(System.currentTimeMillis()); state.activeConnections.add(conn); state.requestCount++; state.accumulatedRequestTime += System.currentTimeMillis() - t; } else { if (log.isDebugEnabled()) { log.debug("A bad connection (" + conn.getRealHashCode() + ") was returned from the pool, getting another connection." ); } state.badConnectionCount++; localBadConnectionCount++; conn = null ; if (localBadConnectionCount > (poolMaximumIdleConnections + 3 )) { if (log.isDebugEnabled()) { log.debug("PooledDataSource: Could not get a good connection to the database." ); } throw new SQLException("PooledDataSource: Could not get a good connection to the database." ); } } } } } if (conn == null ) { if (log.isDebugEnabled()) { log.debug("PooledDataSource: Unknown severe error condition. The connection pool returned a null connection." ); } throw new SQLException("PooledDataSource: Unknown severe error condition. The connection pool returned a null connection." ); } return conn; }
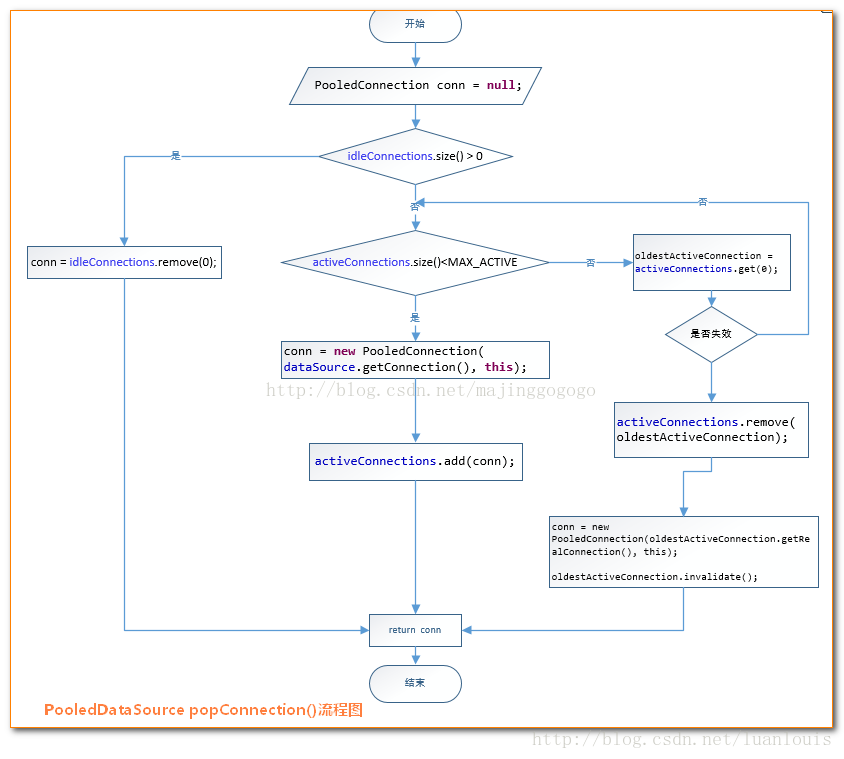
我们看下上面的方法都做了什么:
先看是否有空闲(idle)状态下的 PooledConnection 对象,如果有,就直接返回一个可用的 PooledConnection 对象;否则进行第2步。
查看活动状态的 PooledConnection 池 activeConnections 是否已满;如果没有满,则创建一个新的 PooledConnection 对象,然后放到 activeConnections 池中,然后返回此 PooledConnection 对象;否则进行第三步;
看最先进入 activeConnections 池中的 PooledConnection 对象是否已经过期:如果已经过期,从 activeConnections 池中移除此对象,然后创建一个新的 PooledConnection 对象,添加到 activeConnections 中,然后将此对象返回;否则进行第4步;
线程等待,循环2步。
流程图如下所示:
当我们拿到数据库连接 PooledConnection 后,我们在使用完之后一般来说就要关闭这个数据库连接,但是,对于池化来说,我们关闭了一个数据库连接并不是真正意义上想关闭这个连接,而是想把它放回到数据库连接池中。
怎么实现呢?mybatis 中使用了代理模式有效的解决了该问题。就是返回给外部使用的数据库连接其实是一个代理对象(通过调用 getProxyConnection() 返回的对象)。这个代理对象时在真实数据库连接创建的时候被创建的,如下所示:
1
2
3
4
5
6
7
8
9
public PooledConnection (Connection connection, PooledDataSource dataSource) this .hashCode = connection.hashCode(); this .realConnection = connection; this .dataSource = dataSource; this .createdTimestamp = System.currentTimeMillis(); this .lastUsedTimestamp = System.currentTimeMillis(); this .valid = true ; this .proxyConnection = (Connection)Proxy.newProxyInstance(Connection.class.getClassLoader(), IFACES, this ); }
而在调用这个代理对象的各个方法的时候,都是通过反射的方式,从 invoke() 方法进入,我们来看看:
1
2
3
4
5
6
7
8
9
10
11
12
13
14
15
16
17
18
19
20
21
@Override public Object invoke (Object proxy, Method method, Object[] args) throws Throwable String methodName = method.getName(); if (CLOSE.hashCode() == methodName.hashCode() && CLOSE.equals(methodName)) { dataSource.pushConnection(this ); return null ; } else { try { if (!Object.class.equals(method.getDeclaringClass())) { checkConnection(); } return method.invoke(realConnection, args); } catch (Throwable t) { throw ExceptionUtil.unwrapThrowable(t); } } } private static final String CLOSE = "close" ;
我们可以看到,这里做了一个特殊处理,那就是判断调用的方法名是否是 close() 方法,如果是的话,就调用数据源对象的 pushConnection() 方法将数据库连接放回到连接池中,如下所示:
1
2
3
4
5
6
7
8
9
10
11
12
13
14
15
16
17
18
19
20
21
22
23
24
25
26
27
28
29
30
31
32
33
34
35
36
37
protected void pushConnection (PooledConnection conn) throws SQLException synchronized (state) { state.activeConnections.remove(conn); if (conn.isValid()) { if (state.idleConnections.size() < poolMaximumIdleConnections && conn.getConnectionTypeCode() == expectedConnectionTypeCode) { state.accumulatedCheckoutTime += conn.getCheckoutTime(); if (!conn.getRealConnection().getAutoCommit()) { conn.getRealConnection().rollback(); } PooledConnection newConn = new PooledConnection(conn.getRealConnection(), this ); state.idleConnections.add(newConn); newConn.setCreatedTimestamp(conn.getCreatedTimestamp()); newConn.setLastUsedTimestamp(conn.getLastUsedTimestamp()); conn.invalidate(); if (log.isDebugEnabled()) { log.debug("Returned connection " + newConn.getRealHashCode() + " to pool." ); } state.notifyAll(); } else { state.accumulatedCheckoutTime += conn.getCheckoutTime(); if (!conn.getRealConnection().getAutoCommit()) { conn.getRealConnection().rollback(); } conn.getRealConnection().close(); if (log.isDebugEnabled()) { log.debug("Closed connection " + conn.getRealHashCode() + "." ); } conn.invalidate(); } } else { if (log.isDebugEnabled()) { log.debug("A bad connection (" + conn.getRealHashCode() + ") attempted to return to the pool, discarding connection." ); } state.badConnectionCount++; } } }
简单的说下上面这个方法的逻辑:
首先将当前数据库连接从活动数据库连接集合 activeConnections 中移除;
判断当前数据库连接是否有效,如果无效,则跳转到第4步;如果有效,则继续下面的判断;
判断当前 idleConnections 集合中的闲置数据库连接数量是否没超过设置的阈值且是当前数据库连接池的创建出来的链接,如果是,则将该数据库连接放回到 idleConnections 集合中并且通知在此据库连接池上等待的请求对象线程,如果不是,则将数据库连接关闭;
将连接池中的坏数据库连接数+1,并返回;
JNDI 类型的数据源工厂 JndiDataSourceFactory
对于 JNDI 类型的数据源的获取比较简单,mybatis 中定义了一个 JndiDataSourceFactory 类用来创建通过 JNDI 形式创建的数据源。这个类源码如下:
1
2
3
4
5
6
7
8
9
10
11
12
13
14
15
16
17
18
19
20
21
22
23
24
25
26
27
28
29
30
31
32
33
34
35
36
37
38
39
40
41
42
43
44
45
46
47
48
49
50
51
public class JndiDataSourceFactory implements DataSourceFactory public static final String INITIAL_CONTEXT = "initial_context" ; public static final String DATA_SOURCE = "data_source" ; public static final String ENV_PREFIX = "env." ; private DataSource dataSource; @Override public void setProperties (Properties properties) try { InitialContext initCtx; Properties env = getEnvProperties(properties); if (env == null ) { initCtx = new InitialContext(); } else { initCtx = new InitialContext(env); } if (properties.containsKey(INITIAL_CONTEXT) && properties.containsKey(DATA_SOURCE)) { Context ctx = (Context) initCtx.lookup(properties.getProperty(INITIAL_CONTEXT)); dataSource = (DataSource) ctx.lookup(properties.getProperty(DATA_SOURCE)); } else if (properties.containsKey(DATA_SOURCE)) { dataSource = (DataSource) initCtx.lookup(properties.getProperty(DATA_SOURCE)); } } catch (NamingException e) { throw new DataSourceException("There was an error configuring JndiDataSourceTransactionPool. Cause: " + e, e); } } @Override public DataSource getDataSource () return dataSource; } private static Properties getEnvProperties (Properties allProps) final String PREFIX = ENV_PREFIX; Properties contextProperties = null ; for (Entry<Object, Object> entry : allProps.entrySet()) { String key = (String) entry.getKey(); String value = (String) entry.getValue(); if (key.startsWith(PREFIX)) { if (contextProperties == null ) { contextProperties = new Properties(); } contextProperties.put(key.substring(PREFIX.length()), value); } } return contextProperties; } }
因为这块没看明白,对 JNDI 不是太熟悉,所以这块就不解释了,回头对这块了解了之后再行补充说明。如果有懂的朋友,也可以留言说明一下,谢谢。
If you like this blog or find it useful for you, you are welcome to comment on it. You are also welcome to share this blog, so that more people can participate in it. If the images used in the blog infringe your copyright, please contact the author to delete them. Thank you !