引入依赖
主要增加spring-boot-starter-thymeleaf 和 nekohtml 这两个依赖
spring-boot-starter-thymeleaf:Thymeleaf 自动配置nekohtml:允许使用非严格的 HTML 语法pom.xml 如下:
1
2
3
4
5
6
7
8
9
10
11
12
13
14
15
16
17
18
19
20
21
22
23
24
25
26
27
28
29
30
31
32
33
34
35
36
37
38
39
40
41
42
43
44
45
46
47
48
49
50
51
52
53
54
55
56
57
58
59
60
61
62
63
64
65
66
67
68
<?xml version="1.0" encoding="UTF-8"?> <project xmlns ="http://maven.apache.org/POM/4.0.0" xmlns:xsi ="http://www.w3.org/2001/XMLSchema-instance" xsi:schemaLocation="http://maven.apache.org/POM/4.0.0 http://maven.apache.org/xsd/maven-4.0.0.xsd"> <modelVersion > 4.0.0</modelVersion > <groupId > com.funtl</groupId > <artifactId > hello-spring-boot</artifactId > <version > 0.0.1-SNAPSHOT</version > <packaging > jar</packaging > <name > hello-spring-boot</name > <description > </description > <parent > <groupId > org.springframework.boot</groupId > <artifactId > spring-boot-starter-parent</artifactId > <version > 2.0.2.RELEASE</version > <relativePath /> </parent > <properties > <project.build.sourceEncoding > UTF-8</project.build.sourceEncoding > <project.reporting.outputEncoding > UTF-8</project.reporting.outputEncoding > <java.version > 1.8</java.version > </properties > <dependencies > <dependency > <groupId > org.springframework.boot</groupId > <artifactId > spring-boot-starter-web</artifactId > </dependency > <dependency > <groupId > org.springframework.boot</groupId > <artifactId > spring-boot-starter-tomcat</artifactId > </dependency > <dependency > <groupId > org.springframework.boot</groupId > <artifactId > spring-boot-starter-thymeleaf</artifactId > </dependency > <dependency > <groupId > org.springframework.boot</groupId > <artifactId > spring-boot-starter-actuator</artifactId > </dependency > <dependency > <groupId > org.springframework.boot</groupId > <artifactId > spring-boot-starter-test</artifactId > <scope > test</scope > </dependency > <dependency > <groupId > net.sourceforge.nekohtml</groupId > <artifactId > nekohtml</artifactId > <version > 1.9.22</version > </dependency > </dependencies > <build > <plugins > <plugin > <groupId > org.springframework.boot</groupId > <artifactId > spring-boot-maven-plugin</artifactId > <configuration > <mainClass > com.funtl.hello.spring.boot.HelloSpringBootApplication</mainClass > </configuration > </plugin > </plugins > </build > </project >
在 application.yml 中配置 Thymeleaf
1
2
3
4
5
6
7
spring: thymeleaf: cache: false mode: LEGACYHTML5 encoding: UTF-8 servlet: content-type: text/html
创建测试用 JavaBean
创建一个测试效果的 JavaBean,简单封装一下即可
1
2
3
4
5
6
7
8
9
10
11
12
13
14
15
16
17
18
19
20
21
22
23
24
25
package com.funtl.hello.spring.boot.entity;import java.io.Serializable;public class PersonBean implements Serializable private String name; private Integer age; public String getName () return name; } public void setName (String name) this .name = name; } public Integer getAge () return age; } public void setAge (Integer age) this .age = age; } }
创建测试用 Controller
创建一个 Controller,造一些测试数据并设置跳转
1
2
3
4
5
6
7
8
9
10
11
12
13
14
15
16
17
18
19
20
21
22
23
24
25
26
27
28
29
30
31
32
33
34
35
36
37
38
39
40
41
42
43
package com.funtl.hello.spring.boot.controller;import com.funtl.hello.spring.boot.entity.PersonBean;import org.springframework.stereotype.Controller;import org.springframework.ui.Model;import org.springframework.web.bind.annotation.RequestMapping;import org.springframework.web.bind.annotation.RequestMethod;import java.util.ArrayList;import java.util.List;@Controller @RequestMapping(value = "thymeleaf") public class IndexController @RequestMapping(value = "index", method = RequestMethod.GET) public String index (Model model) PersonBean person = new PersonBean(); person.setName("张三" ); person.setAge(22 ); List<PersonBean> people = new ArrayList<>(); PersonBean p1 = new PersonBean(); p1.setName("李四" ); p1.setAge(23 ); people.add(p1); PersonBean p2 = new PersonBean(); p2.setName("王五" ); p2.setAge(24 ); people.add(p2); PersonBean p3 = new PersonBean(); p3.setName("赵六" ); p3.setAge(25 ); people.add(p3); model.addAttribute("person" , person); model.addAttribute("people" , people); return "index" ; } }
创建测试页面
在 templates 目录下创建 index.html 文件,代码如下:
1
2
3
4
5
6
7
8
9
10
11
12
13
14
15
16
17
18
19
20
21
22
23
24
25
26
27
28
29
<!DOCTYPE html SYSTEM "http://www.thymeleaf.org/dtd/xhtml1-strict-thymeleaf-spring4-4.dtd" > <html xmlns ="http://www.w3.org/1999/xhtml" xmlns:th ="http://www.thymeleaf.org" > <head > <meta charset ="UTF-8" > <title > Hello Thymeleaf</title > </head > <body > <div > <span > 访问 Model:</span > <span th:text ="${person.name}" > </span > </div > <div > <span > 访问列表</span > <table > <thead > <tr > <th > 姓名</th > <th > 年龄</th > </tr > </thead > <tbody > <tr th:each ="human : ${people}" > <td th:text ="${human.name}" > </td > <td th:text ="${human.age}" > </td > </tr > </tbody > </table > </div > </body > </html >
修改 html 标签用于引入 thymeleaf 引擎,这样才可以在其他标签里使用 th:* 语法,声明如下:
1
2
<!DOCTYPE html SYSTEM "http://www.thymeleaf.org/dtd/xhtml1-strict-thymeleaf-spring4-4.dtd" > <html xmlns ="http://www.w3.org/1999/xhtml" xmlns:th ="http://www.thymeleaf.org" >
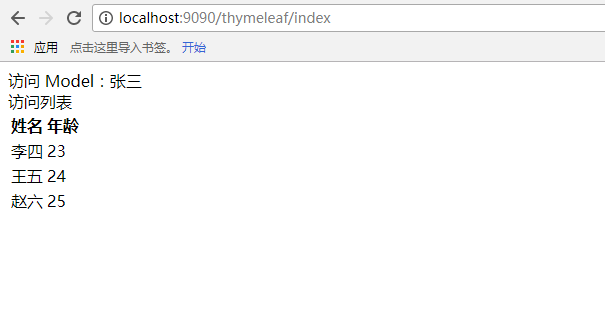
测试访问
启动成功后,访问:http://localhost:9090/thymeleaf/index 即可看到效果
If you like this blog or find it useful for you, you are welcome to comment on it. You are also welcome to share this blog, so that more people can participate in it. If the images used in the blog infringe your copyright, please contact the author to delete them. Thank you !