[Spring Cloud Alibaba] 4 Start a Provider Application

Sample illustrates how to register a service to Nacos...

Posted by Mr.Vincent on 2021-05-26
Estimated Reading Time 12 Minutes
Words 2.3k In Total
Viewed Times

概述

通过一个简单的示例来感受一下如何将服务注册到 Nacos,其实和 Eureka 没有太大差别。

案例

POM

创建一个工程名为 hello-spring-cloud-alibaba-nacos-provider 的服务提供者项目,pom.xml 配置如下:

1
2
3
4
5
6
7
8
9
10
11
12
13
14
15
16
17
18
19
20
21
22
23
24
25
26
27
28
29
30
31
32
33
34
35
36
37
38
39
40
41
42
43
44
45
46
47
48
49
50
51
52
53
54
55
56
57
58
59
60
61
62
63
64
65
66
67
<?xml version="1.0" encoding="UTF-8"?>
<project xmlns="http://maven.apache.org/POM/4.0.0" xmlns:xsi="http://www.w3.org/2001/XMLSchema-instance"
xsi:schemaLocation="http://maven.apache.org/POM/4.0.0 https://maven.apache.org/xsd/maven-4.0.0.xsd">
<modelVersion>4.0.0</modelVersion>
<parent>
<groupId>com.example</groupId>
<artifactId>hello-spring-cloud-alibaba</artifactId>
<version>0.0.1-SNAPSHOT</version>
</parent>

<artifactId>hello-spring-cloud-alibaba-nacos-provider</artifactId>
<packaging>jar</packaging>

<name>hello-spring-cloud-alibaba-nacos-provider</name>
<version>${parent.version}</version>
<url>https://v-vincen.life</url>
<inceptionYear>2021-Now</inceptionYear>
<description>Demo project for Nacos Provider</description>

<properties>
<java.version>1.8</java.version>
</properties>
<dependencies>
<!-- Spring Boot Begin -->
<dependency>
<groupId>org.springframework.boot</groupId>
<artifactId>spring-boot-starter-web</artifactId>
</dependency>

<dependency>
<groupId>org.springframework.boot</groupId>
<artifactId>spring-boot-starter-actuator</artifactId>
</dependency>

<dependency>
<groupId>org.springframework.boot</groupId>
<artifactId>spring-boot-starter-test</artifactId>
<scope>test</scope>
</dependency>
<!-- Spring Boot End -->

<!-- Spring Cloud Alibaba Begin -->
<dependency>
<groupId>com.alibaba.cloud</groupId>
<artifactId>spring-cloud-starter-alibaba-nacos-discovery</artifactId>
</dependency>
<!-- Spring Cloud Alibaba End -->
</dependencies>

<build>
<finalName>${project.artifactId}</finalName>
<plugins>
<plugin>
<groupId>org.springframework.boot</groupId>
<artifactId>spring-boot-maven-plugin</artifactId>
<executions>
<execution>
<goals>
<goal>repackage</goal>
</goals>
</execution>
</executions>
</plugin>
</plugins>
</build>

</project>

Application、Controller

通过 @EnableDiscoveryClient 注解表明是一个 Nacos 客户端,该注解是 Spring Cloud 提供的原生注解。

1
2
3
4
5
6
7
8
9
10
/**
* @author vincent
*/
@SpringBootApplication
@EnableDiscoveryClient
public class HelloSpringCloudAlibabaNacosProviderApplication {
public static void main(String[] args) {
SpringApplication.run(HelloSpringCloudAlibabaNacosProviderApplication.class, args);
}
}
1
2
3
4
5
6
7
8
9
10
11
12
13
14
15
16
17
18
19
20
21
/**
* @author vincent
*/
@RestController
public class NacosProviderController {
@Autowired
private DiscoveryClient discoveryClient;

@Value("${spring.application.name}")
private String serviceId;

@GetMapping(value = "/instances")
public List<ServiceInstance> instances() {
return discoveryClient.getInstances(serviceId);
}

@GetMapping(value = "/echo/{message}")
public String echo(@PathVariable String message) {
return "Hello Nacos Discovery " + message;
}
}

application.yml

1
2
3
4
5
6
7
8
9
10
11
12
13
14
15
16
spring:
application:
name: nacos-provider
cloud:
nacos:
discovery:
server-addr: 127.0.0.1:8848

server:
port: 8081

management:
endpoints:
web:
exposure:
include: "*"

启动工程

通过浏览器访问 http://localhost:8848/nacos,即 Nacos Server 网址。

nacos_server

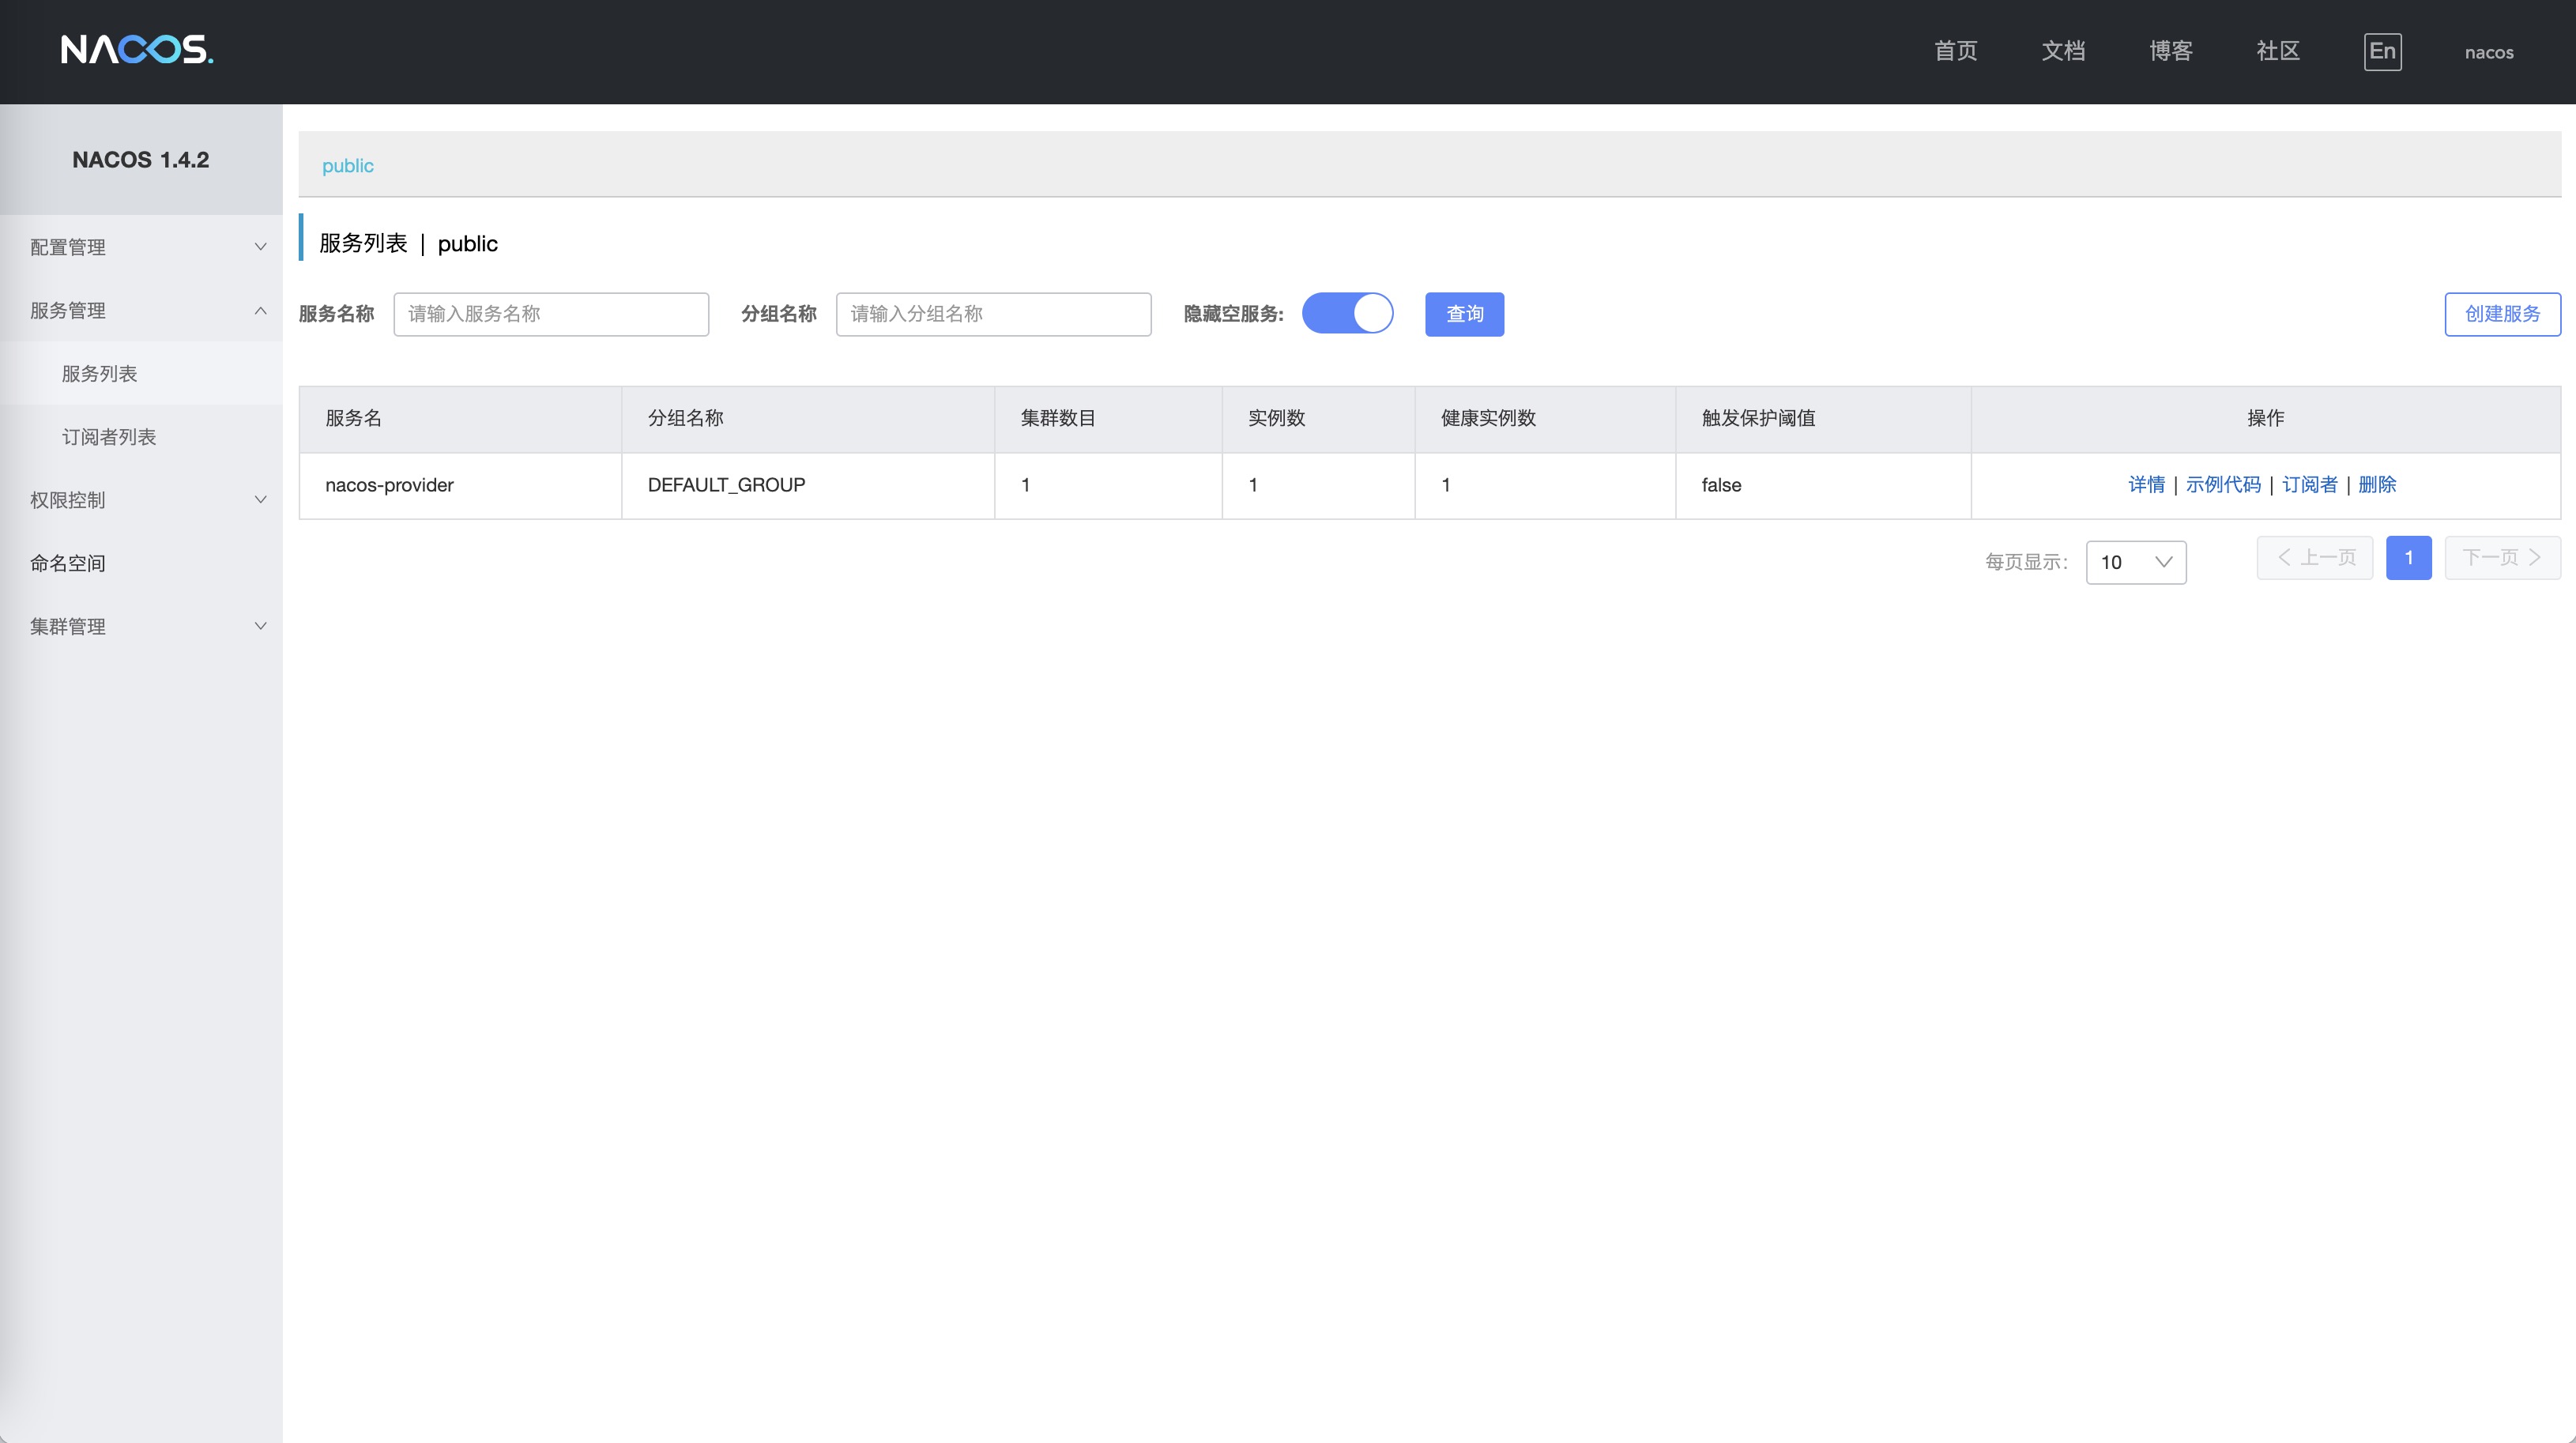
你会发现一个服务已经注册在服务中了,服务名为 nacos-provider。这时访问地址 http://localhost:8081/echo/hi ,你会在浏览器上看到:

1
Hello Nacos Discovery hi

访问地址 http://localhost:8081/instances ,你会在浏览器上看到:

1
2
3
4
5
6
7
8
9
10
11
12
13
14
15
16
17
18
19
[
{
"serviceId": "nacos-provider",
"host": "192.168.0.138",
"port": 8081,
"secure": false,
"metadata": {
"nacos.instanceId": "192.168.0.138#8081#DEFAULT#DEFAULT_GROUP@@nacos-provider",
"nacos.weight": "1.0",
"nacos.cluster": "DEFAULT",
"nacos.ephemeral": "true",
"nacos.healthy": "true",
"preserved.register.source": "SPRING_CLOUD"
},
"uri": "http://192.168.0.138:8081",
"instanceId": null,
"scheme": null
}
]

服务的端点检查

Actuator endpoints 可以让我们监控和与我们的应用(application)交互。Spring Boot actuator 包含了大量的内置 endpoints, 当然,我们也可以添加我们自己的。如何暴露端口取决与你采用的技术。大多数应用采用 HTTP 监控,这时 endpoint 的 ID 就映射为一个接口 URL。通过访问 http://ip:port/actuator,我们可以看到其自带内置的全部 endpoint。

1
2
3
4
5
6
7
8
9
10
11
12
13
14
15
16
17
18
19
20
21
22
23
24
25
26
27
28
29
30
31
32
33
34
35
36
37
38
39
40
41
42
43
44
45
46
47
48
49
50
51
52
53
54
55
56
57
58
59
60
61
62
63
64
65
66
67
68
69
70
71
72
73
74
75
76
77
78
79
80
81
82
83
84
85
86
87
88
89
90
91
92
93
94
95
96
{
"_links": {
"self": {
"href": "http://localhost:8081/actuator",
"templated": false
},
"threaddump": {
"href": "http://localhost:8081/actuator/threaddump",
"templated": false
},
"mappings": {
"href": "http://localhost:8081/actuator/mappings",
"templated": false
},
"info": {
"href": "http://localhost:8081/actuator/info",
"templated": false
},
"health-path": {
"href": "http://localhost:8081/actuator/health/{*path}",
"templated": true
},
"health": {
"href": "http://localhost:8081/actuator/health",
"templated": false
},
"loggers-name": {
"href": "http://localhost:8081/actuator/loggers/{name}",
"templated": true
},
"loggers": {
"href": "http://localhost:8081/actuator/loggers",
"templated": false
},
"caches-cache": {
"href": "http://localhost:8081/actuator/caches/{cache}",
"templated": true
},
"caches": {
"href": "http://localhost:8081/actuator/caches",
"templated": false
},
"beans": {
"href": "http://localhost:8081/actuator/beans",
"templated": false
},
"configprops": {
"href": "http://localhost:8081/actuator/configprops",
"templated": false
},
"env": {
"href": "http://localhost:8081/actuator/env",
"templated": false
},
"env-toMatch": {
"href": "http://localhost:8081/actuator/env/{toMatch}",
"templated": true
},
"refresh": {
"href": "http://localhost:8081/actuator/refresh",
"templated": false
},
"serviceregistry": {
"href": "http://localhost:8081/actuator/serviceregistry",
"templated": false
},
"features": {
"href": "http://localhost:8081/actuator/features",
"templated": false
},
"conditions": {
"href": "http://localhost:8081/actuator/conditions",
"templated": false
},
"heapdump": {
"href": "http://localhost:8081/actuator/heapdump",
"templated": false
},
"nacosdiscovery": {
"href": "http://localhost:8081/actuator/nacosdiscovery",
"templated": false
},
"scheduledtasks": {
"href": "http://localhost:8081/actuator/scheduledtasks",
"templated": false
},
"metrics-requiredMetricName": {
"href": "http://localhost:8081/actuator/metrics/{requiredMetricName}",
"templated": true
},
"metrics": {
"href": "http://localhost:8081/actuator/metrics",
"templated": false
}
}
}

具体详情,这里不做过多叙述,有兴趣的可自行查看官网。

本文中,主要讲述 spring-cloud-starter-alibaba-nacos-discovery 的使用,Actuator 也提供了一个 EndPoint, EndPoint 的访问地址为 http://ip:port/actuator/nacosdiscovery。 主要提供了两类信息:

  • subscribe:显示了当前有哪些服务订阅者。
  • NacosDiscoveryProperties:显示了当前服务实例关于 Nacos 的基础配置。

通过浏览器访问 http://localhost:8081/actuator/nacosdiscovery 你会在浏览器上看到:

1
2
3
4
5
6
7
8
9
10
11
12
13
14
15
16
17
18
19
20
21
22
23
24
25
26
27
28
29
30
31
32
33
34
35
36
37
38
39
40
41
42
43
44
45
46
47
48
49
50
51
52
53
54
55
56
57
58
59
60
61
62
63
64
65
66
67
68
69
70
71
72
73
74
{
"subscribe": [
{
"name": "nacos-provider",
"groupName": "DEFAULT_GROUP",
"clusters": "DEFAULT",
"cacheMillis": 1000,
"hosts": [
{
"instanceId": "192.168.0.138#8081#DEFAULT#DEFAULT_GROUP@@nacos-provider",
"ip": "192.168.0.138",
"port": 8081,
"weight": 1.0,
"healthy": true,
"enabled": true,
"ephemeral": true,
"clusterName": "DEFAULT",
"serviceName": "DEFAULT_GROUP@@nacos-provider",
"metadata": {
"preserved.register.source": "SPRING_CLOUD"
},
"instanceHeartBeatInterval": 5000,
"instanceHeartBeatTimeOut": 15000,
"ipDeleteTimeout": 30000
}
],
"lastRefTime": 0,
"checksum": "",
"allIPs": false,
"valid": true
}
],
"NacosDiscoveryProperties": {
"serverAddr": "127.0.0.1:8848",
"username": "",
"password": "",
"endpoint": "",
"namespace": "",
"watchDelay": 30000,
"logName": "",
"service": "nacos-provider",
"weight": 1.0,
"clusterName": "DEFAULT",
"group": "DEFAULT_GROUP",
"namingLoadCacheAtStart": "false",
"metadata": {
"preserved.register.source": "SPRING_CLOUD"
},
"registerEnabled": true,
"ip": "192.168.0.138",
"networkInterface": "",
"port": 8081,
"secure": false,
"accessKey": "",
"secretKey": "",
"heartBeatInterval": null,
"heartBeatTimeout": null,
"ipDeleteTimeout": null,
"instanceEnabled": true,
"ephemeral": true,
"nacosProperties": {
"secretKey": "",
"namespace": "",
"username": "",
"namingLoadCacheAtStart": "false",
"serverAddr": "127.0.0.1:8848",
"com.alibaba.nacos.naming.log.filename": "",
"clusterName": "DEFAULT",
"password": "",
"accessKey": "",
"endpoint": ""
}
}
}

关于 Nacos Discovery Starter 更多的配置项信息

配置项 Key 默认值 说明
服务端地址 spring.cloud .nacos.discovery .server-addr Nacos Server 启动监听的ip地址和端口
服务名 spring.cloud .nacos.discovery .service ${spring.application.name} 注册的服务名
权重 spring.cloud .nacos.discovery .weight 1 取值范围 1 到 100,数值越大,权重越大
网卡名 spring.cloud .nacos.discovery .network-interface 当IP未配置时,注册的IP为此网卡所对应的IP地址,如果此项也未配置,则默认取第一块网卡的地址
注册的IP地址 spring.cloud .nacos.discovery .ip 优先级最高
注册的端口 spring.cloud .nacos.discovery .port -1 默认情况下不用配置,会自动探测
命名空间 spring.cloud .nacos.discovery .namespace 常用场景之一是不同环境的注册的区分隔离,例如开发测试环境和生产环境的资源(如配置、服务)隔离等
AccessKey spring.cloud .nacos.discovery .access-key 当要上阿里云时,阿里云上面的一个云账号名
SecretKey spring.cloud .nacos.discovery .secret-key 当要上阿里云时,阿里云上面的一个云账号密码
Metadata spring.cloud .nacos.discovery .metadata 使用Map格式配置,用户可以根据自己的需要自定义一些和服务相关的元数据信息
日志文件名 spring.cloud .nacos.discovery .log-name
集群 spring.cloud .nacos.discovery .cluster-name DEFAULT Nacos集群名称
接入点 spring.cloud .nacos.discovery .endpoint 地域的某个服务的入口域名,通过此域名可以动态地拿到服务端地址
是否集成Ribbon ribbon.nacos .enabled true 一般都设置成true即可
是否开启Nacos Watch spring.cloud .nacos.discovery .watch.enabled true 可以设置成false来关闭 watch

If you like this blog or find it useful for you, you are welcome to comment on it. You are also welcome to share this blog, so that more people can participate in it. If the images used in the blog infringe your copyright, please contact the author to delete them. Thank you !