随着开发周期的推移,项目会不断变大,切分出的服务也会越来越多,这时一个个的微服务构成了错综复杂的系统。对于各个微服务系统的健康状态、会话数量、并发数、服务资源、延迟等度量信息的收集就成为了一个挑战。Spring Boot Admin 应运而生,它正式基于这些需求开发出的一套功能强大的监控管理系统。
Spring Boot Admin 有两个角色组成,一个是 Spring Boot Admin Server,一个是 Spring Boot Admin Client,本章节将带领大家实现 Spring Boot Admin 的搭建。
Spring Boot Admin 服务端
创建 Spring Boot Admin Server
创建一个工程名为 hello-spring-cloud-admin 的项目,pom.xml 文件如下:
1
2
3
4
5
6
7
8
9
10
11
12
13
14
15
16
17
18
19
20
21
22
23
24
25
26
27
28
29
30
31
32
33
34
35
36
37
38
39
40
41
42
43
44
45
46
47
48
49
50
51
52
53
54
55
56
57
58
59
60
61
62
63
64
65
66
67
68
69
70
71
72
73
74
75
76
77
<?xml version="1.0" encoding="UTF-8"?> <project xmlns ="http://maven.apache.org/POM/4.0.0" xmlns:xsi ="http://www.w3.org/2001/XMLSchema-instance" xsi:schemaLocation="http://maven.apache.org/POM/4.0.0 http://maven.apache.org/xsd/maven-4.0.0.xsd"> <modelVersion > 4.0.0</modelVersion > <parent > <groupId > com.example</groupId > <artifactId > hello-spring-cloud-dependencies</artifactId > <version > 1.0.0-SNAPSHOT</version > <relativePath > ../hello-spring-cloud-dependencies/pom.xml</relativePath > </parent > <artifactId > hello-spring-cloud-admin</artifactId > <packaging > jar</packaging > <name > hello-spring-cloud-admin</name > <url > http://wvincen.gitee.io</url > <inceptionYear > 2019-Now</inceptionYear > <dependencies > <dependency > <groupId > org.springframework.boot</groupId > <artifactId > spring-boot-starter-web</artifactId > </dependency > <dependency > <groupId > org.springframework.boot</groupId > <artifactId > spring-boot-starter-tomcat</artifactId > </dependency > <dependency > <groupId > org.springframework.boot</groupId > <artifactId > spring-boot-starter-webflux</artifactId > </dependency > <dependency > <groupId > org.springframework.boot</groupId > <artifactId > spring-boot-starter-actuator</artifactId > </dependency > <dependency > <groupId > org.springframework.boot</groupId > <artifactId > spring-boot-starter-test</artifactId > <scope > test</scope > </dependency > <dependency > <groupId > org.jolokia</groupId > <artifactId > jolokia-core</artifactId > </dependency > <dependency > <groupId > de.codecentric</groupId > <artifactId > spring-boot-admin-starter-server</artifactId > </dependency > <dependency > <groupId > org.springframework.cloud</groupId > <artifactId > spring-cloud-starter-zipkin</artifactId > </dependency > <dependency > <groupId > org.springframework.cloud</groupId > <artifactId > spring-cloud-starter-netflix-eureka-server</artifactId > </dependency > </dependencies > <build > <plugins > <plugin > <groupId > org.springframework.boot</groupId > <artifactId > spring-boot-maven-plugin</artifactId > <configuration > <mainClass > com.example.hello.spring.cloud.admin.AdminApplication</mainClass > </configuration > </plugin > </plugins > </build > </project >
主要增加了 2 个依赖,org.jolokia:jolokia-core、de.codecentric:spring-boot-admin-starter-server
1 2 3 4 5 6 7 8 <dependency > <groupId > org.jolokia</groupId > <artifactId > jolokia-core</artifactId > </dependency > <dependency > <groupId > de.codecentric</groupId > <artifactId > spring-boot-admin-starter-server</artifactId > </dependency >
其中 spring-boot-admin-starter-server 的版本号为:2.0.6,这里没写版本号是因为我已将版本号托管到 dependencies 项目中
Application
通过 @EnableAdminServer 注解开启 Admin 功能
1
2
3
4
5
6
7
8
9
10
11
12
13
14
15
package com.funtl.hello.spring.cloud.admin;import de.codecentric.boot.admin.server.config.EnableAdminServer;import org.springframework.boot.SpringApplication;import org.springframework.boot.autoconfigure.SpringBootApplication;import org.springframework.cloud.netflix.eureka.EnableEurekaClient;@SpringBootApplication @EnableEurekaClient @EnableAdminServer public class AdminApplication public static void main (String[] args) SpringApplication.run(AdminApplication.class, args); } }
application.yml
设置端口号为:8084
1
2
3
4
5
6
7
8
9
10
11
12
13
14
15
16
17
18
19
20
21
22
23
spring: application: name: hello-spring-cloud-admin zipkin: base-url: http://localhost:9411 server: port: 8084 management: endpoint: health: show-details: always endpoints: web: exposure: include: health,info eureka: client: serviceUrl: defaultZone: http://localhost:8761/eureka/
主要增加了 Spring Boot Admin Server 的相关配置
1
2
3
4
5
6
7
8
9
management: endpoint: health: show-details: always endpoints: web: exposure: include: health,info
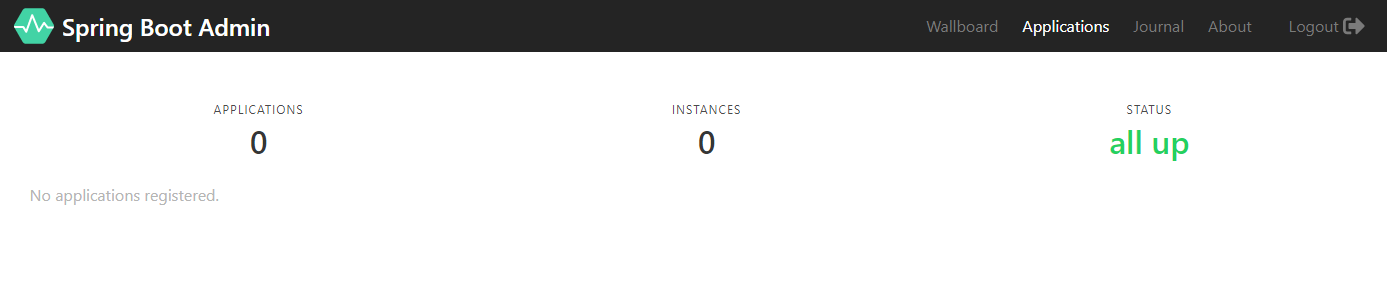
测试访问监控中心
打开浏览器访问:http://localhost:8084 ,会出现以下界面:
Spring Boot Admin 客户端
创建 Spring Boot Admin Client
创建一个工程名为 hello-spring-cloud-admin-client 的项目,pom.xml 文件如下:
1
2
3
4
5
6
7
8
9
10
11
12
13
14
15
16
17
18
19
20
21
22
23
24
25
26
27
28
29
30
31
32
33
34
35
36
37
38
39
40
41
42
43
44
45
46
47
48
49
50
51
52
53
54
55
56
57
58
59
60
61
62
63
64
65
66
67
68
69
70
71
72
73
<?xml version="1.0" encoding="UTF-8"?> <project xmlns ="http://maven.apache.org/POM/4.0.0" xmlns:xsi ="http://www.w3.org/2001/XMLSchema-instance" xsi:schemaLocation="http://maven.apache.org/POM/4.0.0 http://maven.apache.org/xsd/maven-4.0.0.xsd"> <modelVersion > 4.0.0</modelVersion > <parent > <groupId > com.example</groupId > <artifactId > hello-spring-cloud-dependencies</artifactId > <version > 1.0.0-SNAPSHOT</version > <relativePath > ../hello-spring-cloud-dependencies/pom.xml</relativePath > </parent > <artifactId > hello-spring-cloud-admin-client</artifactId > <packaging > jar</packaging > <name > hello-spring-cloud-admin-client</name > <url > http://wvincen.gitee.io</url > <inceptionYear > 2019-Now</inceptionYear > <dependencies > <dependency > <groupId > org.springframework.boot</groupId > <artifactId > spring-boot-starter-web</artifactId > </dependency > <dependency > <groupId > org.springframework.boot</groupId > <artifactId > spring-boot-starter-tomcat</artifactId > </dependency > <dependency > <groupId > org.springframework.boot</groupId > <artifactId > spring-boot-starter-actuator</artifactId > </dependency > <dependency > <groupId > org.springframework.boot</groupId > <artifactId > spring-boot-starter-test</artifactId > <scope > test</scope > </dependency > <dependency > <groupId > org.jolokia</groupId > <artifactId > jolokia-core</artifactId > </dependency > <dependency > <groupId > de.codecentric</groupId > <artifactId > spring-boot-admin-starter-client</artifactId > </dependency > <dependency > <groupId > org.springframework.cloud</groupId > <artifactId > spring-cloud-starter-zipkin</artifactId > </dependency > <dependency > <groupId > org.springframework.cloud</groupId > <artifactId > spring-cloud-starter-netflix-eureka-server</artifactId > </dependency > </dependencies > <build > <plugins > <plugin > <groupId > org.springframework.boot</groupId > <artifactId > spring-boot-maven-plugin</artifactId > <configuration > <mainClass > com.example.hello.spring.cloud.admin.client.AdminClientApplication</mainClass > </configuration > </plugin > </plugins > </build > </project >
主要增加了 2 个依赖,org.jolokia:jolokia-core、de.codecentric:spring-boot-admin-starter-client
1 2 3 4 5 6 7 8 <dependency > <groupId > org.jolokia</groupId > <artifactId > jolokia-core</artifactId > </dependency > <dependency > <groupId > de.codecentric</groupId > <artifactId > spring-boot-admin-starter-client</artifactId > </dependency >
其中 spring-boot-admin-starter-client 的版本号为:2.0.6,这里没写版本号是因为我已将版本号托管到 dependencies 项目中
Application
程序入口类没有特别需要修改的地方
1
2
3
4
5
6
7
8
9
10
11
12
13
package com.funtl.hello.spring.cloud.admin.client;import org.springframework.boot.SpringApplication;import org.springframework.boot.autoconfigure.SpringBootApplication;import org.springframework.cloud.client.discovery.EnableDiscoveryClient;@SpringBootApplication @EnableDiscoveryClient public class AdminClientApplication public static void main (String[] args) SpringApplication.run(AdminClientApplication.class, args); } }
application.yml
设置端口号为:8085,并设置 Spring Boot Admin 的服务端地址
1
2
3
4
5
6
7
8
9
10
11
12
13
14
15
16
17
spring: application: name: hello-spring-cloud-admin-client boot: admin: client: url: http://localhost:8084 zipkin: base-url: http://localhost:9411 server: port: 8085 eureka: client: serviceUrl: defaultZone: http://localhost:8761/eureka/
主要增加了 Spring Boot Admin Client 相关配置
1
2
3
4
5
spring: boot: admin: client: url: http://localhost:8084
测试服务监控
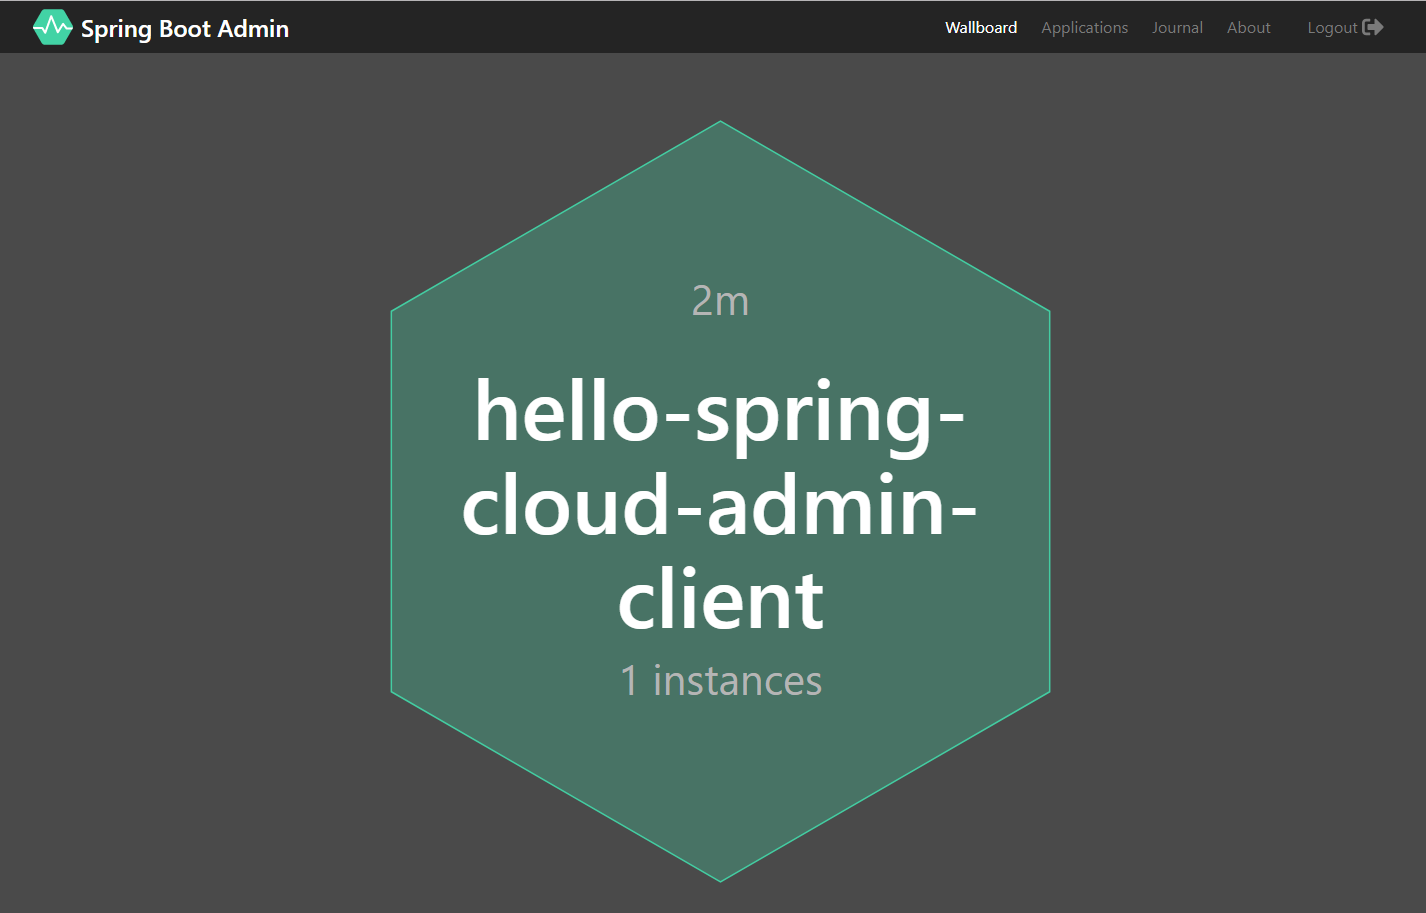
依次启动两个应用,打开浏览器访问:http://localhost:8084 ,界面显示如下:
从图中可以看到,我们的 Admin Client 已经上线了,至此说明监控中心搭建成功
WallBoard
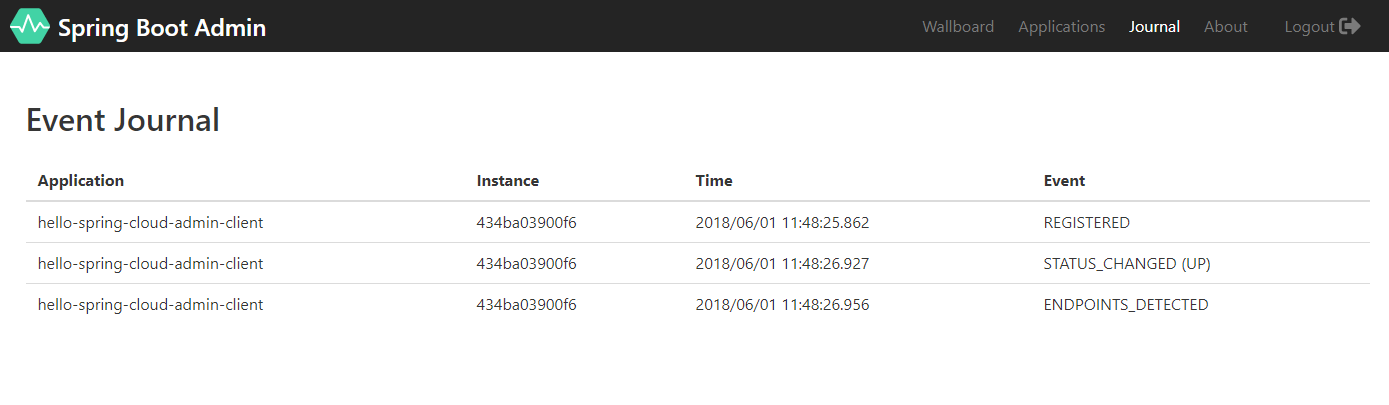
Journal
案例源码:https://github.com/V-Vincen/hello-spring-cloud
If you like this blog or find it useful for you, you are welcome to comment on it. You are also welcome to share this blog, so that more people can participate in it. If the images used in the blog infringe your copyright, please contact the author to delete them. Thank you !