概述
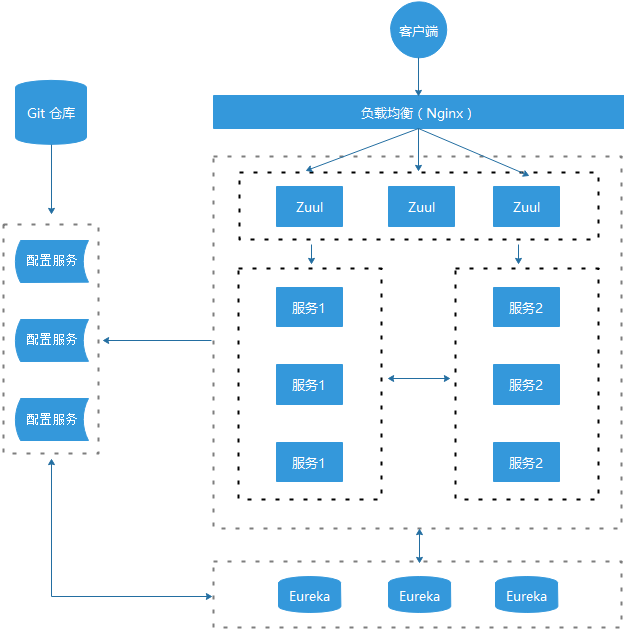
在微服务架构中,需要几个基础的服务治理组件,包括服务注册与发现、服务消费、负载均衡、熔断器、智能路由、配置管理等,由这几个基础组件相互协作,共同组建了一个简单的微服务系统。一个简单的微服务系统如下图:
在 Spring Cloud 微服务系统中,一种常见的负载均衡方式是,客户端的请求首先经过负载均衡(Zuul、Ngnix),再到达服务网关(Zuul 集群),然后再到具体的服。服务统一注册到高可用的服务注册中心集群,服务的所有的配置文件由配置服务管理,配置服务的配置文件放在 GIT 仓库,方便开发人员随时改配置。
Zuul 简介
Zuul 的主要功能是路由转发和过滤器。路由功能是微服务的一部分,比如 /api/user 转发到到 User 服务,/api/shop 转发到到 Shop 服务。Zuul 默认和 Ribbon 结合实现了负载均衡的功能。
创建路由网关
pom.xml 文件如下:
1
2
3
4
5
6
7
8
9
10
11
12
13
14
15
16
17
18
19
20
21
22
23
24
25
26
27
28
29
30
31
32
33
34
35
36
37
38
39
40
41
42
43
44
45
46
47
48
49
50
51
52
53
54
55
56
57
58
59
60
61
62
63
64
<?xml version="1.0" encoding="UTF-8"?> <project xmlns ="http://maven.apache.org/POM/4.0.0" xmlns:xsi ="http://www.w3.org/2001/XMLSchema-instance" xsi:schemaLocation="http://maven.apache.org/POM/4.0.0 http://maven.apache.org/xsd/maven-4.0.0.xsd"> <modelVersion > 4.0.0</modelVersion > <parent > <groupId > com.example</groupId > <artifactId > hello-spring-cloud-dependencies</artifactId > <version > 1.0.0-SNAPSHOT</version > <relativePath > ../hello-spring-cloud-dependencies/pom.xml</relativePath > </parent > <artifactId > hello-spring-cloud-zuul</artifactId > <packaging > jar</packaging > <name > hello-spring-cloud-zuul</name > <url > http://wvincen.gitee.io</url > <inceptionYear > 2019-Now</inceptionYear > <dependencies > <dependency > <groupId > org.springframework.boot</groupId > <artifactId > spring-boot-starter-web</artifactId > </dependency > <dependency > <groupId > org.springframework.boot</groupId > <artifactId > spring-boot-starter-tomcat</artifactId > </dependency > <dependency > <groupId > org.springframework.boot</groupId > <artifactId > spring-boot-starter-actuator</artifactId > </dependency > <dependency > <groupId > org.springframework.boot</groupId > <artifactId > spring-boot-starter-test</artifactId > <scope > test</scope > </dependency > <dependency > <groupId > org.springframework.cloud</groupId > <artifactId > spring-cloud-starter-netflix-eureka-server</artifactId > </dependency > <dependency > <groupId > org.springframework.cloud</groupId > <artifactId > spring-cloud-starter-netflix-zuul</artifactId > </dependency > </dependencies > <build > <plugins > <plugin > <groupId > org.springframework.boot</groupId > <artifactId > spring-boot-maven-plugin</artifactId > <configuration > <mainClass > com.example.hello.spring.cloud.zuul.ZuulApplication</mainClass > </configuration > </plugin > </plugins > </build > </project >
主要是增加了 Zuul 的依赖
1 2 3 4 <dependency > <groupId > org.springframework.cloud</groupId > <artifactId > spring-cloud-starter-netflix-zuul</artifactId > </dependency >
Application
增加 @EnableZuulProxy 注解开启 Zuul 功能
1
2
3
4
5
6
7
8
9
10
11
12
13
14
15
package com.funtl.hello.spring.cloud.zuul;import org.springframework.boot.SpringApplication;import org.springframework.boot.autoconfigure.SpringBootApplication;import org.springframework.cloud.netflix.eureka.EnableEurekaClient;import org.springframework.cloud.netflix.zuul.EnableZuulProxy;@SpringBootApplication @EnableEurekaClient @EnableZuulProxy public class ZuulApplication public static void main (String[] args) SpringApplication.run(ZuulApplication.class, args); } }
application.yml
1
2
3
4
5
6
7
8
9
10
11
12
13
14
15
16
17
18
19
20
spring: application: name: hello-spring-cloud-zuul server: port: 8769 eureka: client: serviceUrl: defaultZone: http://localhost:8761/eureka/ zuul: routes: api-a: path: /api/a/** serviceId: hello-spring-cloud-web-admin-ribbon api-b: path: /api/b/** serviceId: hello-spring-cloud-web-admin-feign
路由说明:
以 /api/a 开头的请求都转发给 hello-spring-cloud-web-admin-ribbon 服务
以 /api/b 开头的请求都转发给 hello-spring-cloud-web-admin-feign 服务
测试访问
依次运行 EurekaApplication、ServiceAdminApplication、WebAdminRibbonApplication、WebAdminFeignApplication、ZuulApplication
打开浏览器访问:http://localhost:8769/api/a/hi?message=HelloZuul ,浏览器显示
1 Hi,your message is :"HelloZuul" i am from port:8763
打开浏览器访问:http://localhost:8769/api/b/hi?message=HelloZuul ,浏览器显示
1 Hi,your message is :"HelloZuul" i am from port:8763
至此说明 Zuul 的路由功能配置成功
配置网关路由失败时的回调
1
2
3
4
5
6
7
8
9
10
11
12
13
14
15
16
17
18
19
20
21
22
23
24
25
26
27
28
29
30
31
32
33
34
35
36
37
38
39
40
41
42
43
44
45
46
47
48
49
50
51
52
53
54
55
56
57
58
59
60
61
62
63
64
65
66
67
68
69
70
71
72
73
74
75
76
77
78
79
80
81
82
83
84
85
86
87
88
89
package com.funtl.hello.spring.cloud.zuul.fallback;import com.fasterxml.jackson.databind.ObjectMapper;import org.springframework.cloud.netflix.zuul.filters.route.FallbackProvider;import org.springframework.http.HttpHeaders;import org.springframework.http.HttpStatus;import org.springframework.http.MediaType;import org.springframework.http.client.ClientHttpResponse;import org.springframework.stereotype.Component;import java.io.ByteArrayInputStream;import java.io.IOException;import java.io.InputStream;import java.util.HashMap;import java.util.Map; * 路由 hello-spring-cloud-web-admin-feign 失败时的回调 * <p>Title: WebAdminFeignFallbackProvider</p> * <p>Description: </p> * * @author Lusifer * @version 1.0 .0 * @date 2018 /7 /27 6 :55 */ @Component public class WebAdminFeignFallbackProvider implements FallbackProvider @Override public String getRoute () return "hello-spring-cloud-web-admin-feign" ; } * 如果请求服务失败,则返回指定的信息给调用者 * @param route * @param cause * @return */ @Override public ClientHttpResponse fallbackResponse (String route, Throwable cause) return new ClientHttpResponse() { * 网关向 api 服务请求失败了,但是消费者客户端向网关发起的请求是成功的, * 不应该把 api 的 404 ,500 等问题抛给客户端 * 网关和 api 服务集群对于客户端来说是黑盒 * @return * @throws IOException */ @Override public HttpStatus getStatusCode () throws IOException return HttpStatus.OK; } @Override public int getRawStatusCode () throws IOException return HttpStatus.OK.value(); } @Override public String getStatusText () throws IOException return HttpStatus.OK.getReasonPhrase(); } @Override public void close () } @Override public InputStream getBody () throws IOException ObjectMapper objectMapper = new ObjectMapper(); Map<String, Object> map = new HashMap<>(); map.put("status" , 200 ); map.put("message" , "无法连接,请检查您的网络" ); return new ByteArrayInputStream(objectMapper.writeValueAsString(map).getBytes("UTF-8" )); } @Override public HttpHeaders getHeaders () HttpHeaders headers = new HttpHeaders(); headers.setContentType(MediaType.APPLICATION_JSON_UTF8); return headers; } }; } }
案例源码:https://github.com/V-Vincen/hello-spring-cloud
If you like this blog or find it useful for you, you are welcome to comment on it. You are also welcome to share this blog, so that more people can participate in it. If the images used in the blog infringe your copyright, please contact the author to delete them. Thank you !